

Hi, I’m ARRYn Rogers, a student in the United States.
As mentioned in my other blog post, my neighborhood does not have yard waste or organic waste bins. My garbage goes straight to the landfill. Since my city is not doing much to mitigate food waste, I decided that I would compost in my own backyard.
Over the summer, my husband and I have composted within our home to put our food waste to good use. We wanted to not only create nutrient rich soil through composting our food waste, but we wanted to reduce our negative impact on the environment.
No matter how small, every effort can help us move towards a more sustainable planet.
I have composted before, but I wanted to see if my city government gave any information on how to compost at home. Much to my surprise they did. From my city government’s website, I learned that for your compost to be healthy, your compost bin needs to contain 3-parts brown material to 1-part green material.
The brown material provides carbon for your compost and the green material provides nitrogen which are both necessary for the breaking down of food waste. Brown materials include things like leaves, dirt, cardboard, and paper bags. Green materials include fruits, vegetables, grass clippings, and coffee grounds. Water must be added to keep the mixture moist which you must turn frequently to aerate the decomposing materials.
Here is a basic guide to compost:

• This image gives you an idea of what is acceptable and not acceptable for your compost pile or bin. It is a great way to visualize the composting process
When the proper ratio is reached between brown material, green material, and water, the food waste will start to break down. They made the process sound so easy I decided to make my own compost bin for my backyard. It was easy to do, and it didn’t cost much money.
Step 1:
You may already have all the materials needed to make your own bin however I didn’t have any extra containers around my house so I chose to go buy a sturdy $12 container that would last a long time. I started by taking my container and drilling holes in the bottom and in the side of the container to allow for proper air circulation for the composting process.
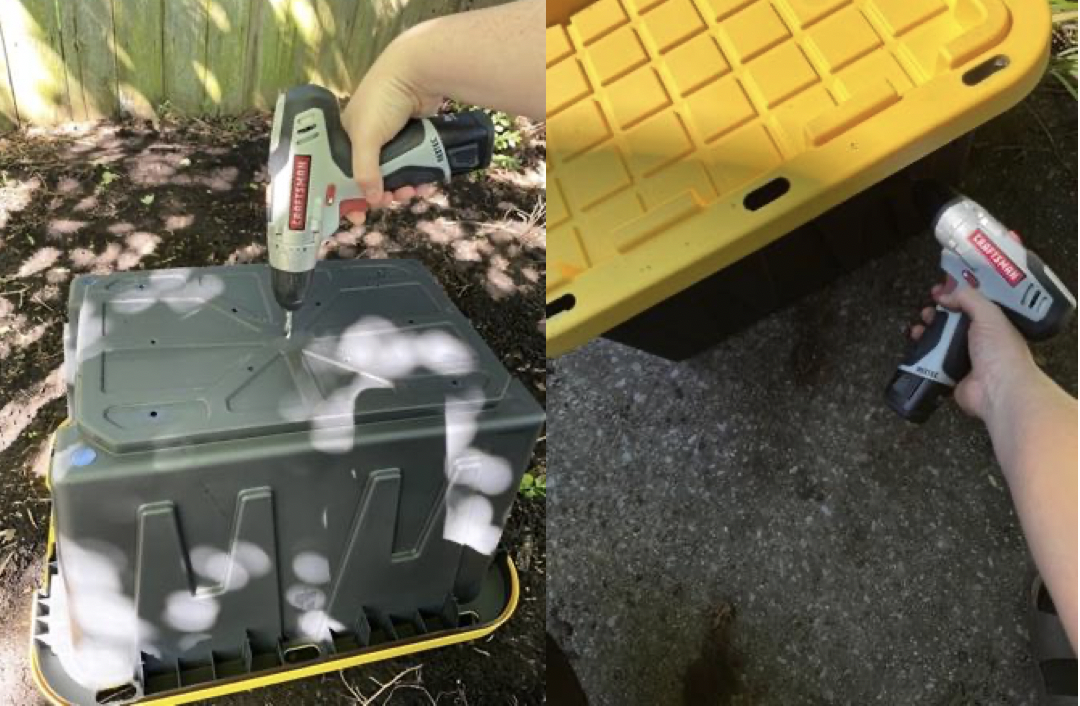
• These two photos show me using a drill to make holes in the bottom and the side of the compost bin for oxygen circulation. Oxygen is very important to the composting process
Step 2:
The next step was to gather the compost materials. First, I gathered my brown materials. Brown materials are important to the composting process because they supply the carbon and add bulk to help allow for airflow within your compost pile. Dried leaves work great as a brown material, but I have a very small backyard and did not have access to any, so I opted for a brown paper bag which was left over from some yard work.

• In this photo you can see the brown waste that I added to my compost bin. I used a paper yard waste bag since I didn’t have any dried leaves in my backyard
I added some soil from my back yard as more brown material to ensure I had a proper brown to greens ratio. The ratio between brown and green material is important because if it isn’t correct, your compost pile may take incredibly long to break down or may start rotting, producing a foul smell.

• This photo shows a thin layer of soil that I have added to the top of my newly created compost bin
Step 3:
Greens are added to supply the nitrogen and complete the ratio, which in my case were food scraps left over from the previous meal I made. Our green mixture consisted of onions, peppers, and mushroom trimmings, as well as some coffee grounds.

• We threw any food scraps that we had into our compost bin. This will create some nutrient rich soil for our garden
Step 4:
Once all the material was gathered, I gave it a stir to make sure it was well mixed.

• It is important to mix or “turn” your compost regularly. This assists with the circulation of oxygen and ensures that the center does not become too moist. If the mixture is too wet, mold and odor will develop. Here I used a spade. But it’s easier to turn the compost with one of the many different types of compost auger.
Step 5:
Once mixed thoroughly, I watered it just enough so that it was moist but not soaked. Watering helps with the decomposition process and should be done when the mixture is completely dry.

• Water is important to the composting process because it helps to regulate the temperature of the mixture and helps with decomposition
Step 6:
My compost bin lives in our shady backyard where it is easily accessible but in the shade. I put it in the shade so that the compost bin would not overheat and cause too much condensation within the bin. Maintaining a proper moisture level and appropriate brown to green ratios will result in nutrient rich compost to use in my garden and help keep food waste out of landfills.

• My compost bin is located in the back of my yard by the fence. This is a nice shady spot for my bin.
This compost process was easy and diverted food waste from landfills.
Not only does it mitigate food waste, it prevents other environmental problems as well.
When I compost, I do not require a garbage truck to come by to pick up my waste as often. The energy saved from trucks not having to drive as much decreases the fossil fuel burned as it is a major contributor to CO2 emissions which is one of the main greenhouse gases in our atmosphere. In addition to decreasing emissions and reducing my food waste, my garden now has nutrient rich soil that I did not have to buy at a store as well as decreasing the need for fertilizer which can be harmful to the environment as well. This whole process has many benefits and mitigates many environmental issues within our community.
Arynn
Compost Sources:
https://bggreensource.org/wp-content/uploads/2019/01/composting-graphic_.pdf